Google 推出约束布局已经有段时间了,用起来也是十分方便好用。关于约束布局的基本用法,可以参考官方文档的 Rerference 和 Training。
约束布局的优势之一就是层级扁平化,没有过多的布局嵌套。这样一来,某些需求用传统写法比较简单简单,用约束布局实现反而麻烦起来了。比如说控制几个相关 View 一起展示或隐藏,传统写法用一个 ViewGroup 将它们包裹起来,然后控制这个 ViewGroup 的可见性即可。而在约束布局中,只能单独设置每个 View 的可见性。因此,约束布局中提供了一个组件——Group来解决这个问题。
Group
Group的用法十分简单,在约束布局中加入一个 <Group/> 标签,然后指定一组 View 的 id 。这样就可以通过改变此 Group 的可见性,来达到预期目的。
<androidx.constraintlayout.widget.Group
    android:layout_width="0dp"
    android:layout_height="0dp"
    android:visibility="visible"
    app:constraint_referenced_ids="v1, v2, v3" />
Group本身的实现也很简单。它继承了ConstraintHelper然后在updatePreLayout() 方法中统一控制相关 View 的可见性,以及阴影。
public class Group extends ConstraintHelper {
    // ...

    public void updatePreLayout(ConstraintLayout container) {
        int visibility = this.getVisibility();
        float elevation = 0.0F;
        if (VERSION.SDK_INT >= 21) {
            elevation = this.getElevation();
        }

        for(int i = 0; i < this.mCount; ++i) {
            int id = this.mIds[i];
            View view = container.getViewById(id);
            if (view != null) {
                view.setVisibility(visibility);
                if (elevation > 0.0F && VERSION.SDK_INT >= 21) {
                    view.setElevation(elevation);
                }
            }
        }
    }

    // ...
}
ConstraintHelper 是什么
ConstraintHelper 继承自 View,因此它可以在 xml 中使用和预览。但它通常没有自己的 UI 样式,只是通过特定的逻辑,去控制其他相关 View 的约束。
它有一个constraint_referenced_ids属性,也就是我们在用Group的时候指定相关 View id 的属性。此类主要作用就是将 xml 中赋值的 id 字符串(如"v1, v2, v3")解析成一组真正的 int 类型的 View id(定义在 R.java 文件中),然后通过getReferencedIds()方法提供给子类使用。
ConstraintHelper 有三个主要的方法,用于处理 View 的逻辑。
updatePreLayout()方法,在给子 View 设置约束的时候调用updatePostLayout()方法,在子 View layout 之后调用updatePostMeasure()方法,在子 View 测量之后调用
通常在updatePreLayout()方法中,按照自己需求调整 View 的约束即可。
实现一个自己的 ConstraintHelper
在约束布局中,所有 View 基本上都处于同一层级,如果想让其中的几个 View 水平或垂直居中,就需要给每个 View 添加重复的约束条件。比起 LinearLayout 中只用设置一下 gravity 来说,还是太繁琐了。那就来实现一个组件,让我们能够很方便地控制一组 View 在同一个方向上居中对齐吧。
先创建一个 ConstraintHelper 的子类 AlignCenter,还有一个自定义属性 aligin_orientation用来指定对齐的方向。可以省略测量过程,把mUseViewMeasure 设置成 false ,同时也直接设置 View.GONE。
class AlignCenter @JvmOverloads constructor(context: Context, attrs: AttributeSet? = null, defStyleAttr: Int = 0)
    : ConstraintHelper(context, attrs, defStyleAttr) {

    private var orientation = 0

    override fun init(attrs: AttributeSet?) {
        super.init(attrs)
        visibility = View.GONE
        mUseViewMeasure = false

        context.obtainStyledAttributes(attrs, R.styleable.AlignCenter).apply {
            orientation = getInt(R.styleable.AlignCenter_align_orientation, 0)
            recycle()
        }
    }

    companion object {
        private const val ORIENTATION_HORIZONTAL = 1 shl 0
        private const val ORIENTATION_VERTICAL = 1 shl 1
        private const val ORIENTATION_BOTH = ORIENTATION_HORIZONTAL or ORIENTATION_VERTICAL
    }
}
<declare-styleable name="AlignCenter">
    <attr name="align_orientation" format="enum">
        <enum name="horizontal" value="1"/>
        <enum name="vertical" value="2"/>
        <enum name="both" value="3"/>
    </attr>
</declare-styleable>
接下来实现对齐的逻辑,按照上一节的内容,我们只需要在 updatePreLayout() 方法中,修改 View 的约束条件即可。那这里拿到解析好的 referencedIds,然后遍历所有 id,根据对齐方向更改 ConstraintLayout.LayoutParams 中的约束参数即可。
class AlignCenter @JvmOverloads constructor(context: Context, attrs: AttributeSet? = null, defStyleAttr: Int = 0)
    : ConstraintHelper(context, attrs, defStyleAttr) {

    // ...

    override fun updatePreLayout(container: ConstraintLayout) {
        val ids = referencedIds
        if (ids.isEmpty()) return

        var parentId = ids.first()
        var index = 1
        while (index < ids.size) {
            val childId = ids[index++]
            applyAlign(container, parentId, childId)
            parentId = childId
        }
    }

    private fun applyAlign(container: ConstraintLayout, parentId: Int, childId: Int) {
        val parent = container.findViewById<View>(parentId)
        val child = container.findViewById<View>(childId)

        val relatedId = if (parent == container) ConstraintLayout.LayoutParams.PARENT_ID else parentId
        val lp = child.layoutParams as ConstraintLayout.LayoutParams

        if (orientation and ORIENTATION_HORIZONTAL != 0) {
            lp.topToTop = relatedId
            lp.bottomToBottom = relatedId
        }
        if (orientation and ORIENTATION_VERTICAL != 0) {
            lp.startToStart = relatedId
            lp.endToEnd = relatedId
        }

        child.layoutParams = lp
    }
}
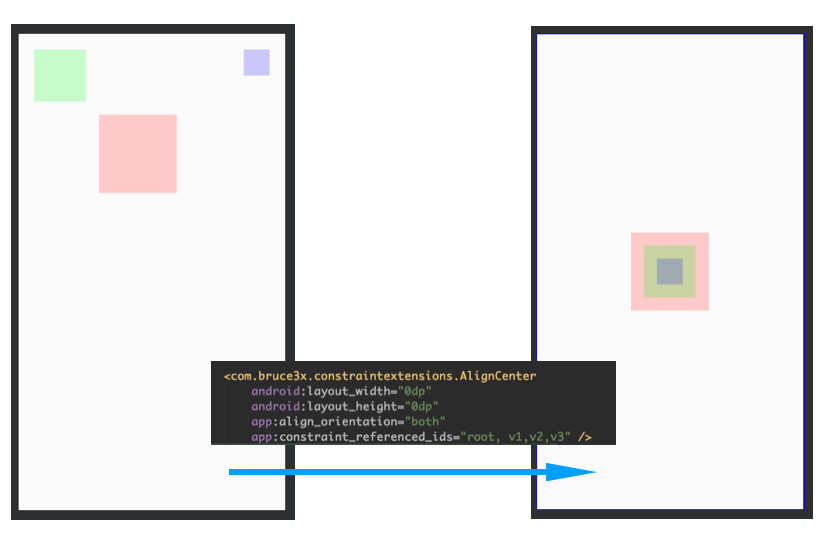
具体使用起来就很简单啦,基本上和 Group 一样(下面代码省略了一些不重要的 View 属性)。
<?xml version="1.0" encoding="utf-8"?>
<androidx.constraintlayout.widget.ConstraintLayout
    android:id="@+id/root">

    <View android:id="@+id/v1" />
    <View android:id="@+id/v2" />
    <View android:id="@+id/v3" />

    <androidx.constraintlayout.widget.Group
        android:layout_width="0dp"
        android:layout_height="0dp"
        android:visibility="visible"
        app:constraint_referenced_ids="v1, v2, v3" />

    <com.bruce3x.constraintextensions.AlignCenter
        android:layout_width="0dp"
        android:layout_height="0dp"
        app:align_orientation="both"
        app:constraint_referenced_ids="root, v1,v2,v3" />
</androidx.constraintlayout.widget.ConstraintLayout>
最终效果如下:
最终项目地址:bruce3x/ConstraintExtensions
在实际使用中,还是有一点小瑕疵,Android Studio 实时预览的时候,并不能识别我们代码给 View 添加的约束条件,会警告说没有添加约束。

目前的解决方案是,在约束布局上加一个 tools:ignore="MissingConstraints" 来忽略掉这一个警告。
在约束布局中写约束条件的时候,如果发现有很多重复的约束逻辑要写,可以考虑实现一个 ConstraintHelper 来复用约束逻辑,减少重复劳动 😏。