0x00 要干啥?
好久没写博客了,最近被两个毕设折腾成狗,这两天部署程序踩了很多坑长了点姿势,记录一下。
毕设需要自己做一个后端程序,为我的 APP 提供 API 数据支持。我就用 Flask 写了个简单的程序,在本地跑起来了,接下来就是部署到服务器上。我原以为把代码放上去,然后 python manage.py 就 ok 了,原来是我太 naive 了。。。
Flask 自带的 server 性能太差,只够调试用的,那么我只好另找途径了。搜索一番,Nginx + uWSGI + Flask 的套路大家用的挺多的,那我也就选择这套方案啦。
0x01 Nginx/uWSGI 是什么
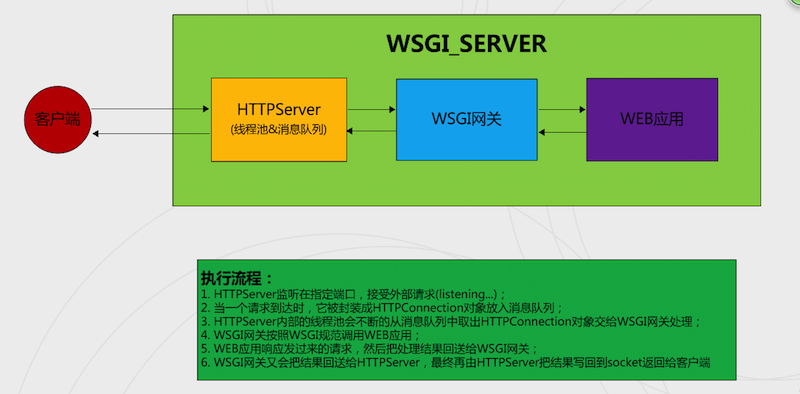
Nginx 是一款高性能的 Web 和 反向代理 服务器。
WSGI, Web 服务器网关接口(Python Web Server Gateway Interface)。
uWSGI,一个实现了 WSGI,uwsgi,http 等协议的服务器,与 nginx 在一个层次, 提供网关服务。
Flask 是一个使用 Python 编写的轻量级 Web 应用框架。
0x02 用 Nginx/uWSGI 部署 Flask
1.环境
CentOS 7.2, Python / 2.7.5, uwsgi / 2.0.12, nginx / 1.6.3
2.配置 Python 虚拟环境和项目依赖
由于应用会添加多种依赖,为了避免污染默认 Python 环境文件,使用 Python 虚拟环境可以独立不同应用的环境
安装 virtualenv > pip install virtualenv
创建虚拟并激活虚拟环境
cd /home/bruce/web
virtualenv ENV
./ENV/bin/activate
使用 deactivate 可以退出虚拟环境
使用 pip 安装项目依赖 > pip install flask
或者通过 requirements.txt 依赖清单,完成批量安装
pip install -r requirements.txt
生成依赖清单可以用命令
pip freeze > requirements.txt
搞定!
3.部署 Flask 程序
在项目目录下,放置 Flask 程序,最简单的 hello.py 如下:
from flask import Flask

app = Flask(__name__)

@app.route('/')
def index():
    return 'Hello Python'

if __name__ == '__main__':
    app.run()
执行 python hello.py 会看到
* Running on http://127.0.0.1:5000/
这样 Flask 程序就跑起来啦~
4.配置 uWSGI 服务器网关服务
通过 pip 安装 > pip install uwsgi
可以通过下面的命令启动应用
uwsgi -s /tmp/uwsgi.sock --module hello --callable app
uwsgi -s /tmp/uwsgi.sock -w hello
也可以从配置文件中加载参数启动:
创建 uwsgi 配置文件 vim /etc/uwsgi/apps-enabled/hello.ini
[uwsgi]
// 开启主线程
master = true

// 项目目录
base = /home/bruce/web

// 移动到项目目录 cd
chdir = %(base)

// 本地的ip和端口
socket = 127.0.0.1:5000

// Python 虚拟环境目录
home = %(base)/ENV

// 程序启动文件
wsgi-file = hello.py

// 项目中引用 flask 实例的变量名
callable = app

// 处理器数
processes = 2

// 线程数
threads = 4

// 获取uwsgi统计信息的服务地址
stats = 127.0.0.1:9191
保存配置文件,通过 uwsgi -i /etc/uwsgi/apps-enabled/hello.ini,来启动 uwsgi。
5.安装配置 Nginx 代理
先添加软件源,然后安装 Nginx
sudo su -c 'rpm -Uvh http://dl.fedoraproject.org/pub/epel/6/x86_64/epel-release-6-8.noarch.rpm'

sudo yum install -y nginx
在 /etc/nginx/ngixn.conf 文件的 http 部分添加一条 include 内容,即最后一行
http {
    include       mime.types;
    default_type  application/octet-stream;
    sendfile        on;
    keepalive_timeout  65;
    include /etc/nginx/sites-enabled/*;
}
创建配置文件 vim /etc/nginx/sites-enabled/hello.conf
server {

    # Running port
    listen 80;
    # 服务器ip 或者域名
    server_name xxx.xxx.xx.xxx;

    # Proxying connections to application servers
    location / {

        include            uwsgi_params;
        uwsgi_pass         127.0.0.1:5000;//和 uWSGI 配置文件中的 ip端口一致
    }
}
使用命令 sudo nginx -t 测试配置文件是否正确。如果出现下面的文字,测试就是通过的啦!
nginx: the configuration file /etc/nginx/nginx.conf syntax is ok
nginx: configuration file /etc/nginx/nginx.conf test is successful
然后使用 sudo nginx -s reload 可以平滑重启服务。
现在就可以通过域名或ip访问项目了,web的请求会转发到 5000 端口。
0x03 设置自启动
由于这些服务是放在服务器上长期运行的,最好将 Nginx 和 uWSGI 配置为系统服务,并且开机自启动。
###1.配置 Nginx 开启启动
sudo vim /etc/init.d/nginx
写入下列内容
#!/bin/bash
# chkconfig: - 85 15
nginx=/usr/sbin/nginx
conf=/etc/nginx/nginx.conf

case $1 in
    start)
        echo -n "Starting Nginx"
        $nginx -c $conf
        echo " done"
    ;;

    stop)
        echo -n "Stopping Nginx"
        $nginx -s stop
        echo " done"
    ;;

    test)
        $nginx -t -c $conf
    ;;

    reload)
        echo -n "Reloading Nginx"
        $nginx -s reload
        echo " done"
    ;;

    restart)
        $0 stop
        $0 start
    ;;

    show)
        ps -aux|grep nginx
    ;;

    *)
        echo -n "Usage: $0 {start|restart|reload|stop|test|show}"
    ;;

esac
粗略地看一下,也就是通过命令后第一个参数,case 判断相应的操作(start, stop, test, reload, restart, show )。
给脚本添加可执行属性 sudo chmod +x /etc/init.d/nginx
添加为系统服务(开机自启动)
sudo chkconfig --add nginx
sudo chkconfig nginx on
启动 Nginx 服务
sudo service nginx start
###2.配置 uWSGI 开机启动
和 nginx 类似的操作:
创建脚本
sudo vim /etc/init.d/uwsgi
写入
#!/bin/bash
# chkconfig: - 85 15
uwsgi=/usr/bin/uwsgi
hello_conf=/etc/uwsgi/apps-enabled/hello.ini

case $1 in
    start)
        echo -n "Starting uWsgi"
        nohup $uwsgi -i $hello_conf >/var/log/uwsgi/hello.log 2>&1 &
        echo " done"
    ;;

    stop)
        echo -n "Stopping uWsgi"
        killall -9 uwsgi
        echo " done"
    ;;

    restart)
        $0 stop
        $0 start
    ;;

    show)
        ps -ef|grep uwsgi
    ;;

    *)
        echo -n "Usage: $0 {start|restart|stop|show}"
    ;;

esac
添加可执行属性
sudo chmod +x /etc/init.d/uwsgi
添加为系统服务
sudo chkconfig --add uwsgi
sudo chkconfig uwsgi on
启动 uWSGI 服务
sudo service uwsgi start
注:脚本开头要写上 # chkconfig: - 85 15 ,不然无法添加为系统服务(网上有的代码少了这句话)。
0x04 小题普丝(tips) ╰(°▽°)╯
- 熟练掌握 vi/vim 读写保存文件
- 更改 Nginx 配置之后,使用
sudo service nginx test测试 - 测试通过 Nginx 配置之后,使用
sudo service nginx reload平滑重启服务 - 常查 log,有 bug 一般在日志文件中会有报错
- Nginx 在
/var/log/nginx目录下有access.log和error.log两个日志文件 - uWSGI 在
/var/log/uwsgi目录下有项目对应日志 - Flask 程序可以自己保存日志
- Nginx 在
- 改配置文件什么的,最好备个份,免得改挂掉了一脸懵逼ʘʚʘ,不要问我怎么知道的。。
- 用
ps -ef | grep uwsgi可以查看当前 uwsgi 的进程,必要时能根据 pid 把它 kill 掉。nginx 同理 - 待续 …